What is a Data Workflow and why it is hard to manage
A data workflow is a well-defined series of steps to accomplish a particular data-related task.
Common examples include:
-
Data pipelines - Extracting, Loading and Transforming (ELT) data from one data source to another
-
Analytics Engineering - creating, calculating or building analytics or data warehouse models using SQL
-
Machine Learning - training, evaluating and deploying a ML model.
Data workflows range from simple to very complex, with hundreds of steps and branching/dependencies. Due to its complex nature and inter-related steps, managing data workflows is often a daunting task.
Fortunately, we have Airflow!
So in this blog I’ll explore some best practices to hopefully make the Airflow experience less daunting for newcomers.

What is Airflow?
Airflow (https://airflow.apache.org/) is a leading Apache open-source data orchestration tool for running data workflows - used in many tech companies.
For example, Uber and Airflow’s original creator, Airbnb both use Airflow extensively.
Airflow provides an easy-to-use web UI, with integrated logging, monitoring, workflow run management, dependency handling. This includes managing dependencies and task monitoring/management through its web UI:
-
monitor the status of each step in the workflow
-
trigger re-runs and retries
-
view the logs for each step
-
visualise what dependencies there are.
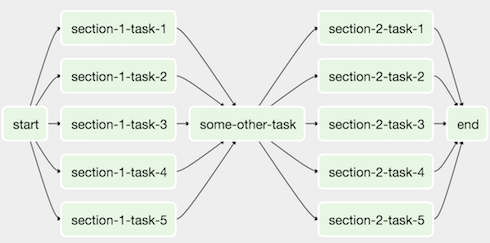
Airflow workflows are ‘DAGs’ and 100% code
In Airflow, the technical name for data workflows is Directed Acrylic Graphs (DAGs). It’s called DAG because the series of tasks only ‘flow’ one direction (and it doesn’t double back on itself).
Other Airflow-specific terminology:
-
Each DAG run is known as a job
-
Each ‘step’ of the workflow is known as a task
An example of an Airflow DAG looks like this:
The main function of Airflow is its ability to schedule workflow runs. That is, there are 3 main ways a Airflow job can be triggered:
-
manually (through the UI or CLI)
-
on a scheduled interval (e.g. every 30 minutes)
-
sensors (i.e. event-driven) - for example, a sensor on a file system or S3 bucket to trigger when new files are loaded.
Furthermore, it also has high availability, redundancy, error and retry handling. This is done by automatically handling retries, supporting exponential backoff, maximum retries and retry delays.
In a way, it combine sthe functions of a cronjob and a queuing/polling system.
All DAGs/workflows are also 100% in code, meaning everything can be:
- rigorously automated testing (e.g. unit tests)
- subject to good code review processes
- deployed as part of a CI/CD process
Important concept - Airflow is NOT a big data processing engine
It is important to appreciate that Airflow plays the role of an excellent data workflow orchestrator. However, it is not intended to replace big data processing engines, such as Apache Spark or Apache Druid.
In basic terms, you can think of Airflow like Azure Data Factory, but with pipelines completely written in code.
Therefore as best practice, you should look to offload as part of your data processing to other systems. For example, if you need to do transformations, use a Spark cluster. If you need to copy data from S3 into Snowflake, use Snowflake’s load function.
This fundamental concept underpins all the other best practices explored below.
 Photo by Mike from Pexels
Airflow is not an engine, but an orchestrator
Photo by Mike from Pexels
Airflow is not an engine, but an orchestrator
- What is a Data Workflow and why it is hard to manage
- What is Airflow?
- Airflow Best Practice #1 -
- Airflow Best Practice #2
- Airflow Best Practice #3
- Airflow Best Practice #4
- Airflow Best Practice #5
- Airflow Best Practice #6
- Airflow Best Practice #7
- Airflow Best Practice #8
- Airflow Best Practice #9
- Fully take advantage of the UI’s features
- Airflow Best Practice #10
- Have common dependencies sit in a parent DAG
- Closing Thoughts
Airflow Best Practice #1 -
Understand how the Airflow scheduler and metadata database work
While Airflow does provide a clean and easy-to-use UI, it is still important to understand how the various components work under-the-hood. There are certain quirks with Airflow that are not obvious on the surface. Importantly, you should understand these two key components: the scheduler and the metadata database.
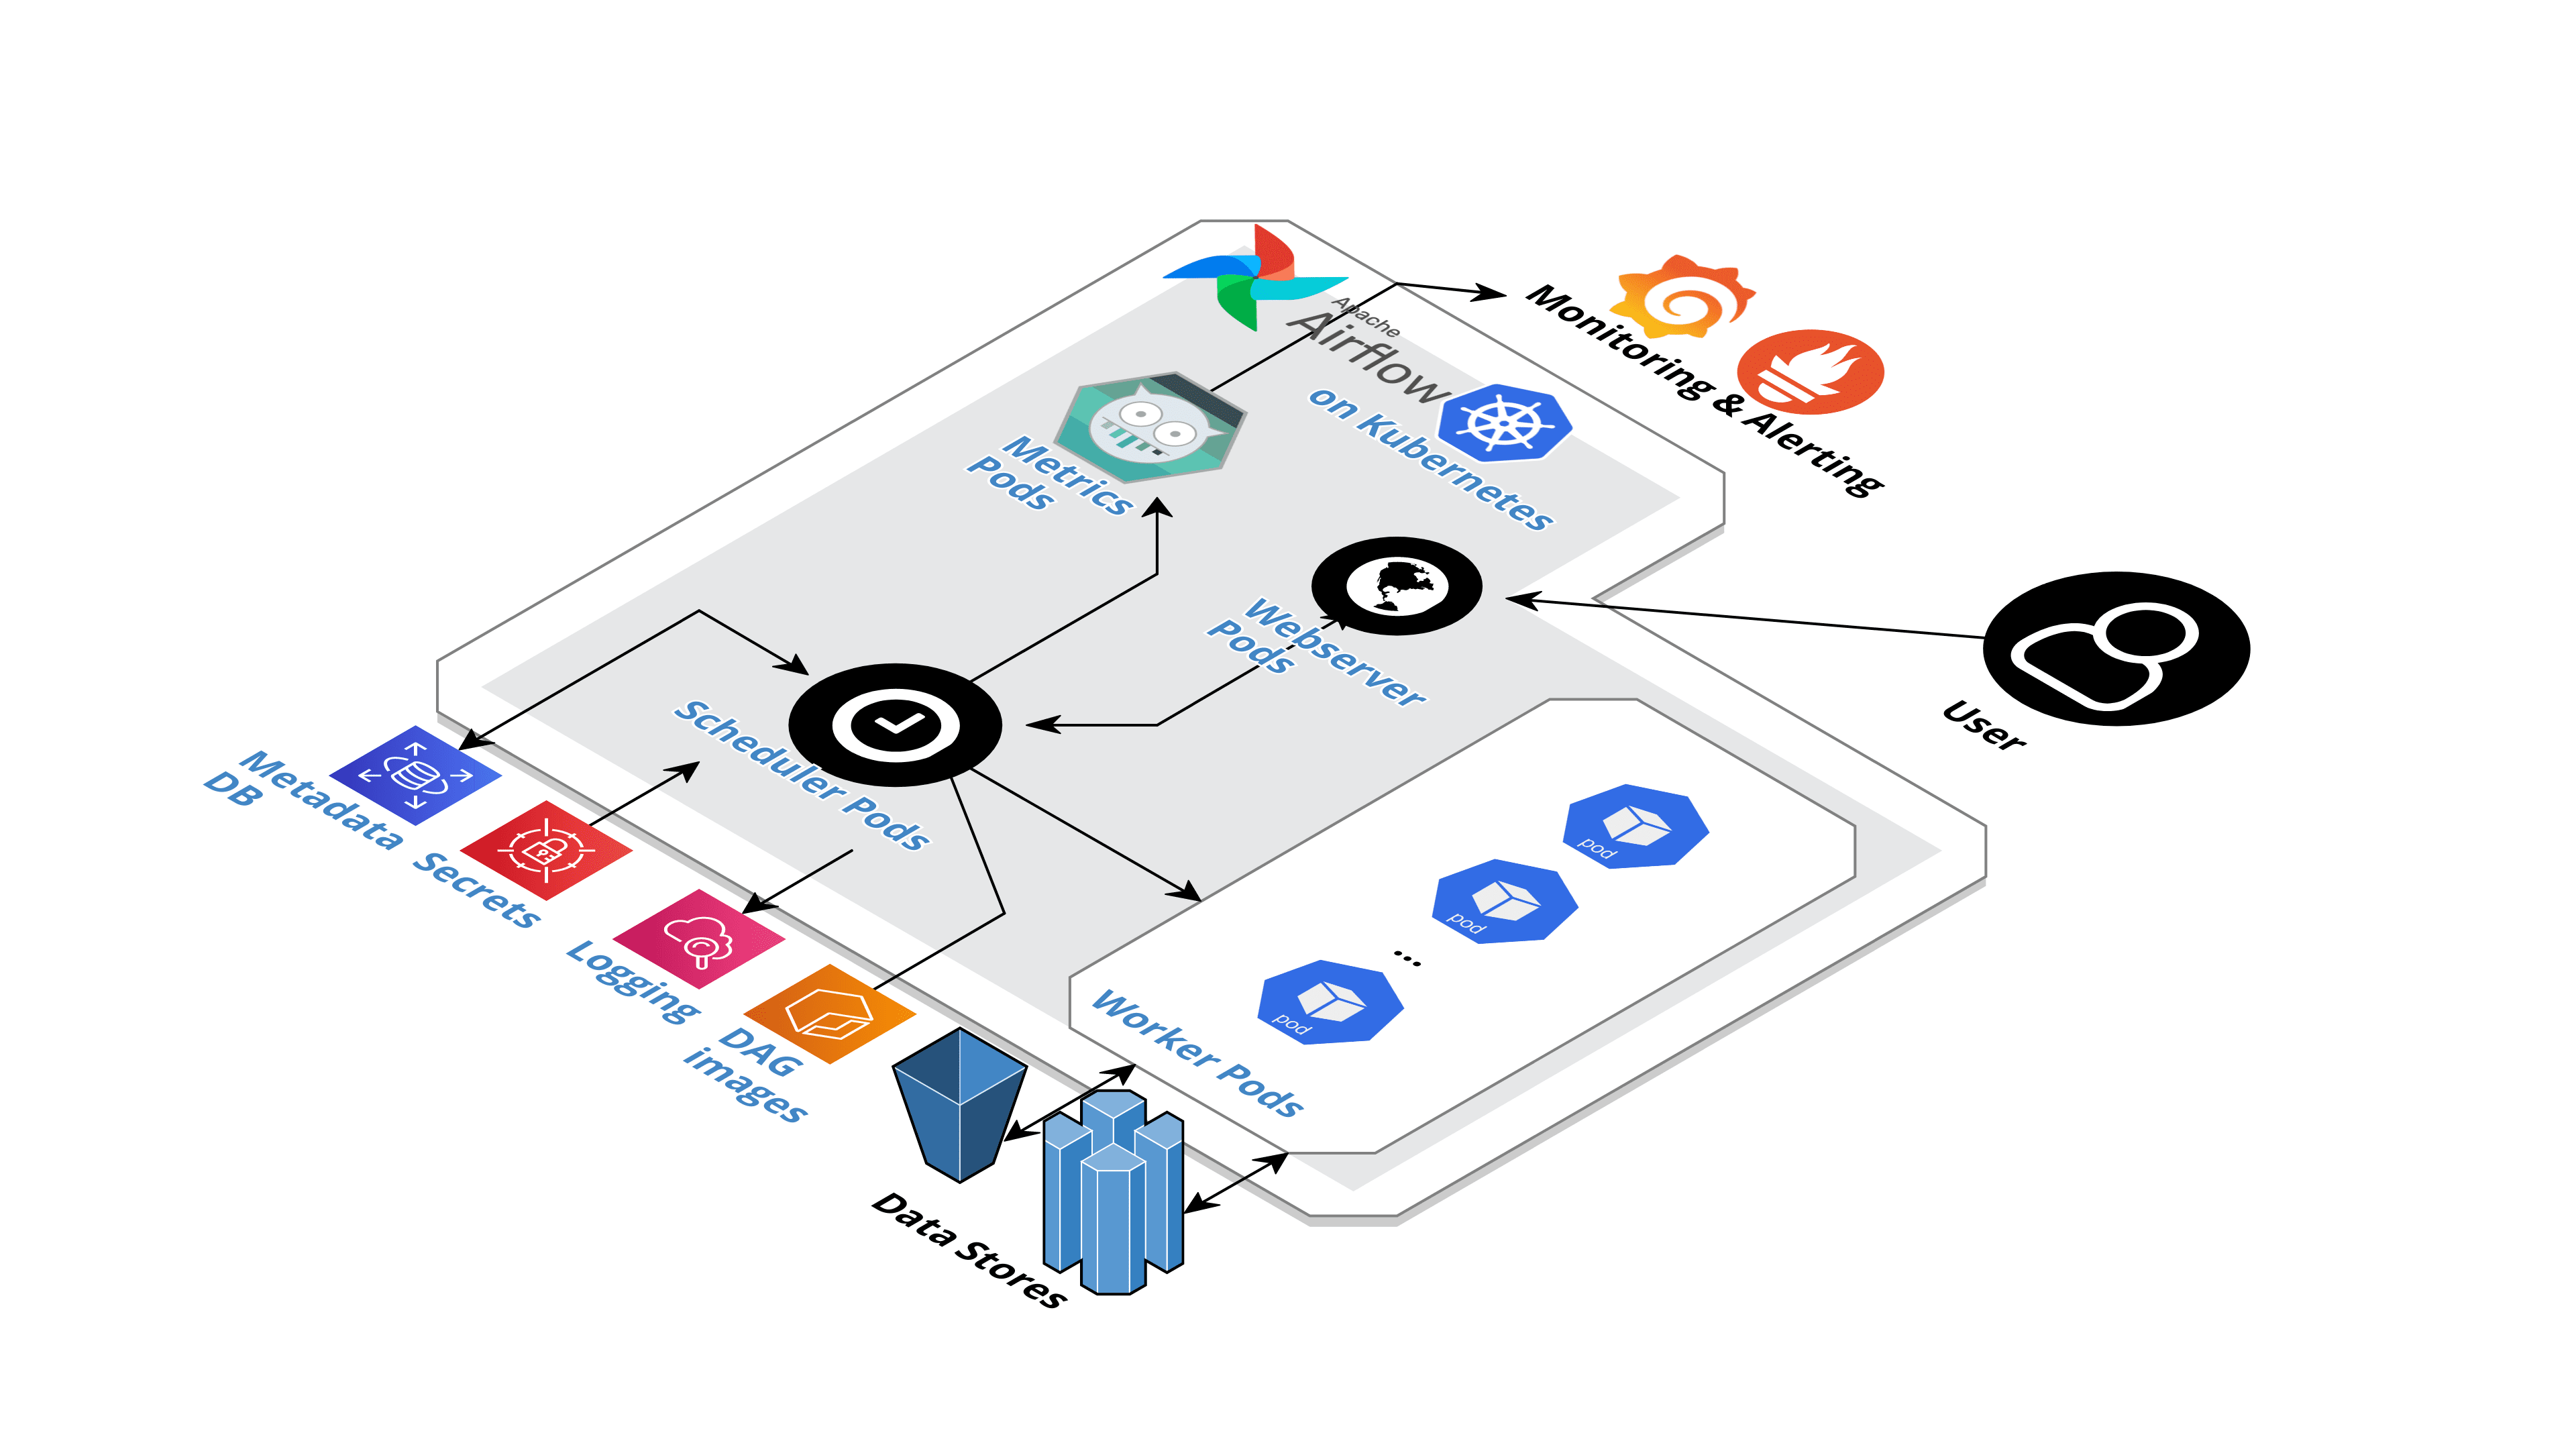 High-level architecture of an Airflow on Kubernetes I implemented in AWS
Diagram created using cloudcraft.io
High-level architecture of an Airflow on Kubernetes I implemented in AWS
Diagram created using cloudcraft.io
As shown above:
- Webserver - what users interact with (i.e. the web UI)
- Worker pods - execute the tasks and interact with the data stores
- RDS, CloudWatch and SSM - used for password management, metadata storage and logging
- ECR - used to keep the Docker images which contain the DAGs
- A combination of Statsd, Prometheus and Grafana - used for monitoring and alerting
Now I’ll explain the scheduler and metadata DB in more detail below.
Understand the quirks of the Airflow Scheduler
The scheduler is the arguably the most important component of Airflow. It’s key functions are:
- Orchestrating all the DAGs and their tasks
- Dealing with task interdependencies
- Resource allocation for the number of DAG runs
- Scheduling future executions of DAGs
- Obtaining the DAG and underlying code dependencies needed to run the tasks
- Spinning up workers to execute the DAG tasks (e.g. for Airflow in Kubernetes, the Scheduler contacts the Kubernetes API to spin up a new pod worker for each task)
One of the drawbacks of Airflow is how the scheduler handles scheduling intervals. Unlike a simple cron job, the scheduler was built with certain assumptions that may seem unintuitive at first glance.
That is, Airflow was originally built with the ETL/scheduling framework, meaning that it is designed for workflows that runs on a set schedule to copy the previous period’s data. For example, if you have an ETL job that runs at 12am, it will copy the data for the previous day, so the run on Monday 12am is actually copying data for Sunday.
Therefore, if a DAG is scheduled to run at a given time, Airflow will wait for the schedule_interval to pass before triggering it. This means when the DAG is triggered, the DAG run execution date is different from the DAG run.
For example, if you schedule a DAG to run every hour from 7am onwards, the first execution will be at 8am. However, while the DAG is triggered at 8am, the execution date will be 7am.
To further complicate this, you can also manually trigger DAG runs with a specified execution date. For example:
airflow dags trigger -e 2021-01-01T12:00:00 [dag_id]
This will result in Airflow ‘backdating’ an execution date:
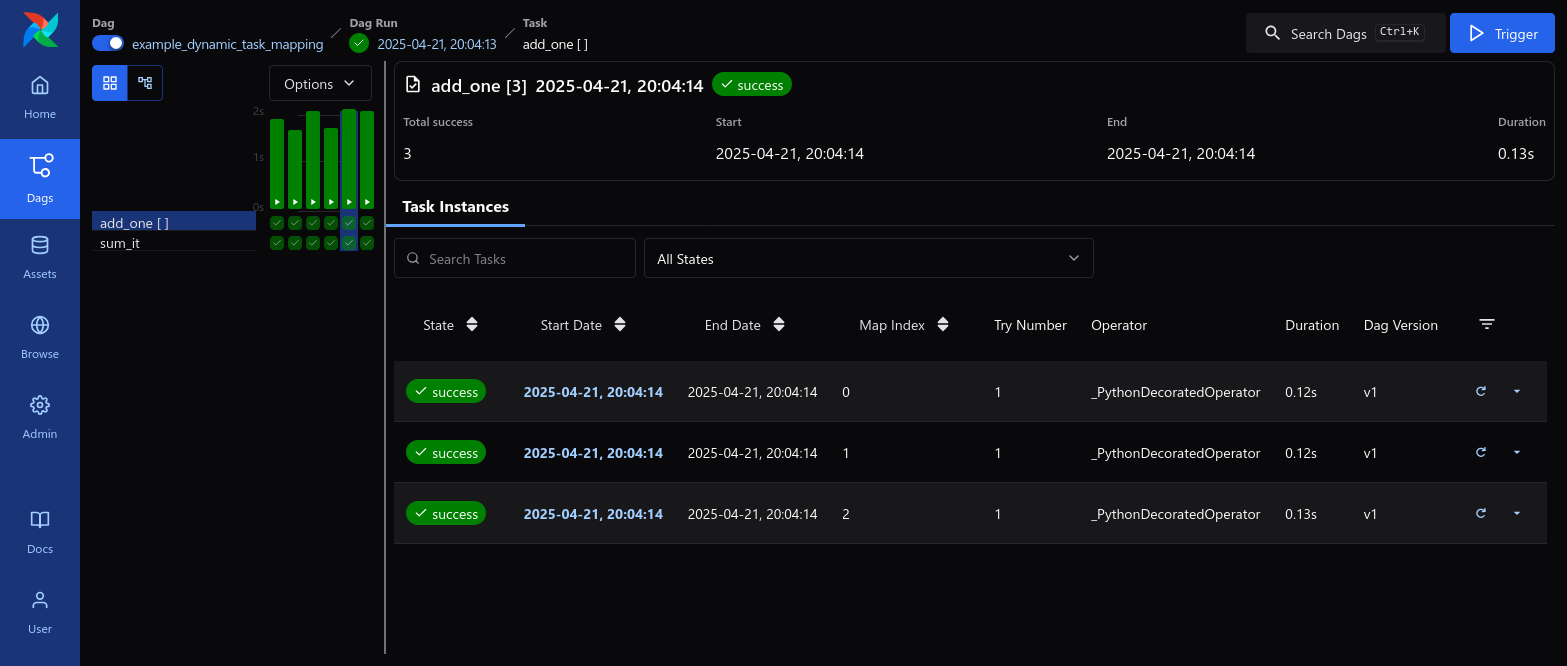 You can see the arrow indicates the current run, which is happening after all the runs that have finished. Red runs indicate there was a failure and dark green indicate they were successful runs.
Image courtesy from Apache Airflow
You can see the arrow indicates the current run, which is happening after all the runs that have finished. Red runs indicate there was a failure and dark green indicate they were successful runs.
Image courtesy from Apache Airflow
This blog post provides an excellent explanation of the scheduling interval and explains it far better than I ever could. Check it out if you’re keen to know more.
Deploying custom Python libraries
The Scheduler plays the role as the ‘source of truth’ for your code base. It contain all the source code for the DAGs, including module dependencies etc. So if you need a particular Python library installed, it will need to be installed on the Airflow Scheduler. I would recommend using a Docker image for your Airflow Scheduler and have the dependencies installed that way.
For example, a Dockerfile:
FROM apache/airflow:2.1.2 as airflow
RUN pip install pandas
You then can deploy this Airflow image either via docker-compose (if using Docker) or via minikube (if using Kubernetes).
Minor point: if you ever need to execute Airflow CLI commands, the best way is to shell into the Airflow Scheduler. For example, running airflow dags list.
Understand the metadata database and external connections
The metadata database contains most of the key information about the Airflow ecosystem, including:
- audit logs of all DAG executions and runs
- state of each task (e.g. success or failure)
- users and roles
- external connections (e.g. AWS)
This database is updated by the Scheduler, but you can query the metadata directly using SQL. In fact Astronomer has two useful guides here and here that discuss how to do this. Most implementations of Airflow will use PostgreSQL as the metadata database, which makes querying the metadata database like querying any other regular RDBMS.
For example, you can query (using SQL) the audit logs and DAG runs to create your own BI visualisations in Tableau or PowerBI.
As part of this metadata database, Airflow has a built-in connection store, which will save the passwords encrypted in its metadata database (public.connection table). You can add/remove these secrets via the Web UI and can easily fetch them in your DAG code. So now you don’t need to hardcode secrets into your code base!
In the below example, I have saved a AWS profile named aws_default which has the AWS secret key ID and access secret key. To use it, the AWSHook in Airflow just needs to know the name of the profile:
s3_task = S3Operator(
    task_id='s3_task'
    ...
    aws_conn_id='aws_default'
)
)
Pretty straightforward!
If you want to take it to the next level, you can set up integration with AWS Systems Manager (SSM) Parameter Store, which lets you securely store secrets encrypted.
In your airflow.cfg, you simply set:
[secrets]
backend = airflow.providers.amazon.aws.secrets.systems_manager.SystemsManagerParameterStoreBackend
backend_kwargs = {"connections_prefix": "/airflow/connections", "profile_name": "default"}
NOTE: profile_name is whatever AWS credential profile is being used by Airflow to connect to AWS. Generally, it’s default unless you expressly change it.
You then add the secrets in AWS SSM in the following naming convention: /airflow/connections/....
Airflow has a ‘pecking’ order in which to look for connections and variables:
- Airflow checks AWS SSM for the connection - e.g. for
aws_defaultit will look for a/airflow/connections/aws_defaultconnection in AWS SSM. - If not there, Airflow checks the Airflow metadata database (i.e. the built-in connection store mentioned above)
- If not there, Airflow checks whether there’s any connections in environment variables. That is, any env variables called
AIRFLOW__CONN__AWS_DEFAULT.
Airflow Best Practice #2
Treat your tasks like transactions - they should be idempotent and atomic
I cannot stress how important this point is! In data workflows, failures occur every now and then where many are out of your control. For example, database connection dropouts, dirty data or schema changes etc.
When you have failures, you naturally have retries, where the same workflow or even task can be retried/re-run multiple times until it succeeds. Airflow allows you to set retries by task or even the entire DAG (if any one of the tasks fails).
Therefore, you cannot afford to have your workflows breaking or data becoming corrupted due to failures or retries.
To avoid data corruption due to failures and retries, you need to make your tasks idempotent and atomic. Idempotency is the mathematical term for a function that, for the same input, always generates the same outcome every time, regardless of its prior state. In broad terms, the idea is to make sure you never:
-
Generate duplicates when executing the same task multiple times in a row
-
Generate different results when you execute the same task with the same inputs
-
Generate different results if you have multiple concurrent runs of the same task
 Lack of Indempotency is the fastest way to make your data workflow grind to a halt
Image by Pixabay from Pexels
Lack of Indempotency is the fastest way to make your data workflow grind to a halt
Image by Pixabay from Pexels
Similarly, an atomic task follows the same principles as relational database systems. That is, it is ‘all-or-nothing’ - either the entire task successfully completes and stores the results, or the entire task is rolled back. This is essential to ensure no ‘half-baked’ results are accidentally placed into the system. Each task should be able to be re-run independently to other tasks.
Many of these principles on idempotency and atomic are covered in a previous blog post on event-driven architecture.
 You want each task to be independent, but yet flows onto the next one
Photo by Pixabay from Pexels
You want each task to be independent, but yet flows onto the next one
Photo by Pixabay from Pexels
Airflow-specific ways to achieve idempotent and atomic tasks include:
-
Create cleanup/rollback tasks that are only trigger when a task fails. You achieve this by having the cleanup tasks’s
trigger_rule=TriggerRule.ONE_FAILEDor have a ‘if failed’ branch with thePythonBranchOperator. -
Don’t use
INSERTif possible (use UPSERT orMERGE). For blob/file storage (e.g. S3), create or replace is recommended to prevent duplicate files. -
Don’t use time dependent variables in your code - e.g.
CURRENT_TIMESTAMP(). Where possible, these should be passed in as parameters. -
Don’t rely on reading the latest partition (e.g. Athena, Spark) or record (e.g. relying on the order of a
SELECTstatement with anORDER BY DATE_INSERTED). You should use a pre-defined watermark or identifier to query data - e.g. customer records from 1000 to 4001.
Astronomer’s own best practices also covers this point and they explain the concept very well.
Airflow Best Practice #3
Extend on Operators where possible
Operators are the Python classes that actually do the executing of a task. Airflow has 100% of its DAGs in code, so you have the flexibility and freedom to code your Operators to use the entire suite of Python - classes, logging, unit testing, pandas and other libraries (e.g. Psycopg, sqlalchemy). This means if you can’t find an out-of-the-box Airflow Operator that works, you can just create a custom operator!
Creating a custom operator is simply just extending Airflow’s BaseOperator and adding in the extra logic or libraries.
The way that Operators interact with external services is through Hooks (e.g. to S3, Postgres). Extending on that, custom operators should use Airflow’s built-in hooks where possible to make DAGs easier to read and perform. Airflow takes care of connections, authentication and many other things if you take advantage.
Here’s a small example where it takes advantage of Airflow’s S3 and Postgres hooks to read data from an S3 bucket, parse the JSON and store the output in a Postgres database:
from airflow.models.baseoperator import BaseOperator
from airflow.providers.amazon.aws.hooks.s3 import S3Hook
from airflow.providers.postgres.hooks import postgres

class ParseConfigOperator(BaseOperator):
    """This Custom Operator reads the JSON from an S3, parses it and stores the output"""
    def __init__(
            self,
            s3_location,
            **kwargs
        ) -> None:
        super().__init__(**kwargs)
        self.s3_location: str = s3_location
        self.aws_conn_id: str = 'aws_default'

    def execute(self, s3_location, context):
        """Execute the Operator"""
        data = self.load_data_from_s3(s3_location)

    def load_data_from_s3(s3_bucket) -> BytesIO:
        """Load the data from the specified S3 bucket and returns it."""
        # Use Airflow's built-in S3 hook so authentication is handled
        session = S3Hook(
            aws_conn_id=self.aws_conn_id,
            verify=None
        ).get_session()
        s3 = session.client('s3')
        response = s3.get_object(Bucket=s3_bucket ...)
        # Do data checks here
        ...
        return response

    def parse_config(data) -> DataFrame:
        """Parses the configuration and executes validation checks.
        Returns the parsed config.
        """
        df = pd.read_json(data)
        # Do validation checks here
        ...
        return df

    def store_results_in_postgres(dataframe):
        """Store results in postgreSQL"""
        # Use Airflow's built-in PG hook so authentication is handled
        ctx = postgres('mypostgresdb' ... ).get_conn()
        dataframe.to_sql(ctx)
Airflow Best Practice #4
Use intermediate stages to store your data
While this applies to Airflow, this actually is a general data engineering principle. For workflows, you should break up the steps into bite-size tasks so each step stores the intermediate results in a stage. That way, you can easily re-run from a specific task and debug what the output was at a particular step.
 Using intermediate stages is like steps in a stairs - each step is built on the last one
Image by Pixabay from Pexels
Using intermediate stages is like steps in a stairs - each step is built on the last one
Image by Pixabay from Pexels
If you are following an ELT framework, this could look like:
-
Extract and Load - one for one copy into staging. Avoid putting business logic in this layer - just have it copy and stage the relevant data.
-
Transform - applying logic. Place your logic in here. Use intermediate tables/data stores as needed (see below)
-
Consume - In the future if we decide to build out data warehouses (e.g. Kimball), this is the layer where you will build out your FACT and DIM tables
Staging all the data in a spot before going to the next step is crucial to ensure data loss doesn’t happen (e.g. the source system goes offline). Avoid saving states and data into Airflow - for every step, you should output the data into intermediary stages. For example:
-
if you have 3 steps for Athena - end of each step you should save the data either into a S3 parquet file or into a Athena temporary/permanent table. By using an intermediate storage (e.g. S3 or a SQL/Athena staging table), you can test the Extract/Load vs Transformation steps in your code separately. This is very useful for debugging (and also saves a lot of money).
-
if you have 3 transformation SQL queries that take 3 hours minutes each, you don’t want to have to re-run it all if you just need to test Step 3. Having intermediate stages means you can just kick the DAG off from step 3.
Airflow Best Practice #5
Your top-level DAG code should be just the orchestrator
This follows the key concept that Airflow is just an orchestrator, not an engine or execution framework. Your top-level DAG code is the Python file that has your entire DAG - i.e. the with DAG(...). Think of this Python file as more of a ‘definition’ and should not house the actual logic and processing code.
So if you need to create python functions, you should place them in a separate module - ideally in the airflow/plugins folder (as Airflow looks there first when loading custom modules).
Importantly, don’t have any code that actually processes or produces output in the top-level DAG code. This is because all the code in this DAG python file is executed whenever the DAG is parsed. Airflow’s Scheduler will poll and parse the DAG quite frequently, so you could end up generating unintended data.
Similarly with SQL, you should not write your query in the top-level DAG:
with DAG(
    'my_dag'
    ...
):
    read_data = PostgresOperator(
        task_id='read_data'
        ...
        sql="""
        SELECT * FROM data
        WHERE customer_id=123
        """
    )
Instead, you should place the query in a separate .sql file - ideally in an airflow/sql folder.
 with DAG(
    'my_dag'
    …
	template_searchpath='./sql/' # This tells Airflow where the SQL files are
):
    read_data = PostgresOperator(
        task_id='read_data'
        ...
        sql="sql/extract_data.sql",
    )
Furthermore, you should avoid hardcoding and use parameters instead:
with DAG(
    'my_dag'
    ...
):
    read_data = PostgresOperator(
        task_id='read_data'
        ...
        sql="extract_data.sql",
        parameters={"customer_id": 1234}
    )
In your extract_data.sql file, you would therefore have:
SELECT * FROM data
WHERE customer_id= '{{ params.customer_id }}'
This is very useful if you want to use the same sql file for development and production, but don’t want to touch production data in a development run. You can add prefixes in your sql like FROM {env_prefix}_data and specify env_prefix="dev" when running the DAG.
Use common modules if they are shared between DAGs
Rather than repeat the same method in every DAG or custom operator, you should custom Python modules. Remember to follow the Airflow directory convention - place your custom Python modules ideally in somewhere like airflow/plugins.
HINT: If you put your modules here, it makes imports easier, as the default path for Airflow imports is airflow/plugins.
For example, you could have a s3.py common module that contains functions to interact with AWS S3 (e.g. with boto3). Then in your custom operators or DAGs you then, for example:
from s3 import push_s3_to_postgres
# Where push_s3_to_postgres is a
# function written to push S3 files to Postgres
Also remember to take advantage of default_args and doc_md for DAGs so you don’t need to constantly pass in the same parameters for every operator/task. You do this by passing in the default_args for your top-level DAG code:
default_args = {
    'email_on_failure': False
}

# Uses markdown
DAG_DOCS = """
## My DAG
This is an awesome documentation.
"""

with DAG(
    'my_dag',
    default_args=default_args,
    doc_md=DAG_DOCS,
    …
):
    ...
doc_md allows you to provide text at the top of your DAG in Markdown (.md).
Airflow Best Practice #6
Tests are important!
General software and data engineering principle: unit tests are essential! This is even more true where 100% of the workflows are in code. Airflow’s strongest advantage is being all its workflows in code, so everything can be tested. In contrast, other data orchestration tools (especially drag-and-drop) don’t provide the same level of testing abilities. Believe me, it is quite difficult to unit test a SSIS package (I’ve done it before and it was not pretty).
Unit testing in general has been covered in a prior blog post so check it out if you want more details!
Specifically, Airflow, you can see examples of how Airflow operators are unit tested in the source code itself.
Here’s a quick example:
####tests/conftest.py
@pytest.fixture
def setup_task():
    '''
    Set up a mock task for ParseConfigOperator
    '''
    # First you create the mock DAG
    mock_dag = DAG(
        'test_dag',
        default_args={
                'owner': 'airflow',
                'start_date': datetime.datetime(2018, 1, 1)
        },
        schedule_interval=datetime.timedelta(days=1)
    )
    # Next you create the mock task using the mock DAG
    mock_task = ParseConfigOperator(
        task_id='test',
        dag=mock_dag
    )

    return mock_task

### test_parseconfig_operator.py #########

# Import your custom operator
from operators.parseconfig_operator import ParseConfigOperator

def test_parse_config(test_dag):
    '''Test the parse_config() method in ParseConfigOperator'''
    task = setup_task
    mock_input = {'test': 'test'}

    results = task.parse_config(mock_input)
    assert results == what you want to assert
As you can see, besides some boilerplate code to create a mock DAG, writing unit tests for the methods is similiar to how you would do it for other Python code.
In addition, you need to also test the ‘validity’ of the DAG itself. That is, you want to catch ‘compiling’ errors before your deploy your code to your Airflow cluster. The most simplest form of ‘validity’ test is seeing whether the DAG python file loads.
python my_dag.py
However, if you want to unit test this, you can do:
from airflow.models import DagBag

def test_dag_integrity():
    '''
    Test to ensure DI DAG imports correctly - should cover:
    - Compile/import errors
    - Syntax errors
    - Cyclical dependencies
    '''
    with patch.dict('os.environ', AIRFLOW_VAR_ENV_PREFIX='DEV'):
        dag_bag = DagBag(
            dag_folder='airflow/dags'
        )

        assert 'my_dag' in dag_bag.dags
For integration tests, you can also dry-run your DAGs. This doesn’t add any entries into the DAG run or logs so it doesn’t stuff up the scheduling intervals.
As with the trigger function, you can specify a custom execution_date.
airflow tasks test my_dag_id my_task_id 2021-01-01T12:00:00
airflow dags test my_dag_id 2021-01-01T12:00:00
Airflow Best Practice #7
Take advantage of built-in macros
Airflow has built-in macros, which provide a range of excellent variables.
Say you want to do incremental/delta loading based on a watermark. One option is to build an audit log and handle all the logic yourself. However, Airflow already has a built-in audit log for each DAG run and records the execution_date for each time.
prev_execution_date_success is a wonderful macro that returns the execution_date of the last successful run. So if a DAG run, it doesn’t actually advance the watermark. Taking advantage of this macro means you don’t need to re-create a complex watermarking system!
run_id returns the unique identifier for this particular DAG run. This is great for tracing back which run generated/updated which row. If using some other tools (e.g. SSIS), you might have to manually implement this, set up an audit log table to record all the runs. But with Airflow, it comes out of the box!
So if you want to only load files that were loaded since the last run:
SELECT
*,
'{{ run_id }}' as run_id
FROM data
WHERE timestamp
BETWEEN '{{ prev_execution_date_success }}'
AND '{{ execution_date }}'
 Watermarks are essential in incremental loading workflows
Image by Peter H from Pixabay
Watermarks are essential in incremental loading workflows
Image by Peter H from Pixabay
Airflow Best Practice #8
Take advantage of XCOM like a built-in audit database
I mentioned in a prior blog post about audit dimension tables and how they are very useful essentially for data warehousing/pipelines. In short, they are tables which capture the history of data changes done - e.g. run_id 1234 inserted data into table XYZ for periods 1-12-2020 to 31-12-2020.
Airflow has cross-communiations (XComs), which is a mechanism that allows tasks to share variables with each other. For example, in a task, when an insert SQL is done, it will push a from_date and to_date to XCOM under a watermark variable. The easiest way this is done is by returning a value for the Operator:
class RunCustomSQLOperator:
    ...
    def execute(self, ...):
        from_date = # Logic here
        to_date = # Logic here

        ...
        # Do your Custom Operator logic here

        return {
            'from_date': from_date,
            'to_date': to_date,
            'status': 'success'
        }
When XCOMs are stored, it automatically stores the dag_id, task_id and run_id of the particular run, which is very handy because that’s what you need for an audit log. When the XCOM value is stored via a return, it will be under the key return_value. As such, you can directly query the metadata database to retrieve the information in subsequent SQL runs:
SELECT *
FROM {{ task_instance.xcom_pull(task_ids='foo', key='return_value') }}
Example of what that looks like in the Airflow XCOM database:
| XCOM Field | XCOM Value |
|---|---|
| Key | return_value |
| Value | {'from_date': '2020-01-01', 'to_date': '2020-12-31', 'status': 'success'} |
| Timestamp | 2021-11-30, 21:00:41 |
| Execution Date | 2021-11-30, 20:31:56 |
| Task Id | insert_my_awesome_data_incrementally |
| Dag Id | awesome_dag |
Under the hood, by default, XCOM values are stored in Airflow’s metadata database. As mentioned above, you can then run queries on it like any other database - in particular to query this ‘audit’ table:
SELECT
    dag_id,
    task_id,
    encode(value, 'escape')::jsonb ->> 'run_id' as run_id,
    encode(value, 'escape')::jsonb ->> 'run_id' as from_date,
    encode(value, 'escape')::jsonb ->> 'run_id' as to_date,
    execution_date,
    timestamp as last_updated
FROM airflow.public.xcom
WHERE
    dag_id = <your dag>
    AND key = 'return_value'
    AND task_id = <your task>
    AND encode(value, 'escape')::jsonb ->> 'status' = 'success'
    AND encode(value, 'escape')::jsonb ->> 'run_id' = <insert your run_id to query>
Airflow Best Practice #9
Fully take advantage of the UI’s features
While the default view is generally the grid/tree view (unless you change it), there are multiple tabs in which to view information about DAG runs.
Arguably the four most important are:
- Grid View
- Graph View
- Gantt Chart
- Code View
I won’t go into too much detail on the types, as the Airflow documentation describes this very well, but in brief:
- Grid View allows you to see all the runs and their tasks
- Graph View shows you all the task dependencies and how they interact
- Gantt chart shows you how long can task took in comparison to the total runtime
- Code view shows you the actual Python code for the DAG (top-level code)
Also, a great best practice is attaching a link to your Playbooks for each DAG as part of the DAG’s documentation. Airflow allows you write markdown so you can read it at the top of your DAG view. To do this, you simply go:
with DAG('example_http_operator', default_args=default_args) as dag:
    dag.doc_md = """
    My awesome documentation. Even does Markdown!

    # Heading 1.
    More info to come.

    - Even bullet points
    """
This makes maintaining DAGs much easier! When there’s an incident with a DAG, the user logging in can view all the information they need at the top of the page.
You can even specify dependencies required for this DAG, the parameters used, etc.
Airflow Best Practice #10
Have common dependencies sit in a parent DAG
If you have common upstream dependencies for multiple DAGs, rather than repeating the same tasks in all the different DAG, it may be better to have it sit in a parent DAG.
When the parent DAG finishes executing, it spins up the downstream DAGs.
A common scenario for this is for Data Warehouse creations - a central data mart with dimension tables needed to be generated first and used by multiple subsequent fact table refreshes. The fact tables are often updated and to avoid having to re-deploy the DAG every time, a subset of the fact table forms a child DAG.
That is:
Parent DAG (calculates the main dimension tables)
—–Child DAG 1 (calculates subset of fact tables 1)
—–Child DAG 2 (calculates subset of fact tables 2)
—–Child DAG 3 (calculates subset of fact tables 3)
There are two ways to achieve this:
-
‘Push’ based method where the upstream DAG will trigger the downstream DAGs upon success
-
‘Pull’ based method where the downstream DAGs have sensors that ‘listen’/poll when the upstream DAG is successfully ran
Airflow recommends that:
-
‘Pull’ method - when the downstream DAGs have different schedules to the parent DAG, use an ExternalTaskSensor. This basically listens and waits until the last task on the parent DAG finishes executing.
-
‘Push’ method - if the upstream and downstream DAGs have same schedule intervals, use TriggerDagRunOperator. This is basically is a task that triggers the downstream DAGs to run.
An example of implementing the TriggerDagRunOperator is as follows. In this case, the parent DAG has 1 task, which when completed will invoke 3 downstream DAGs.
# This is the parent DAG

with DAG(...) as dag:

    task1 = DummyOperator(
        task_id='task1'
    )

    ...

    downstream_dags = ['my_child_dag1', 'my_child_dag2', 'my_child_dag3']

    for child_dag in downstream_dags:
        dependency_task = TriggerDagRunOperator(
            trigger=TriggerRule.ALL_DONE # Only run this task
                                         # when all the upstream tasks
                                         # are completed
            task_id=f'{child_dag}_trigger',
            trigger_dag_id=child_dag,
            execution_date= # This aligns it so the
                                                # children DAG runs have
                                                # the same execution_date
                                                # as the parent DAG
        )

        task1 >> dependency_task
Closing Thoughts
Hopefully these best practices will breakdown the entry barrier of getting into Airflow. The 100% code is quite daunting for someone who is coming from a drag-and-drop data tool background (e.g. Azure Data Factory).
But in the end, the benefits of Airflow do pay off, especially for production-grade complex workflows!
 It does pay off! Trust me!
Image by Foundry Co from Pixabay
It does pay off! Trust me!
Image by Foundry Co from Pixabay